
|
Configuring trends can be performed using MiScout Desk(see installing MiScout Desk).
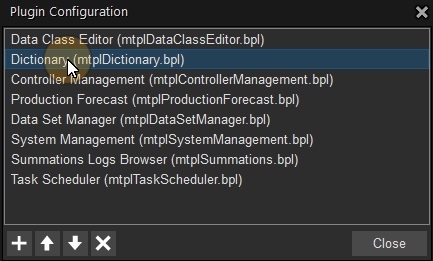
To be able to create and configure trends in MiScout Desk, first thing you require is the Dictionary (mtplDictionary.bpl) plug-in.

Therefore, first of all, make sure that the required plug-in is already listed in the Plugin Configuration dialog. If this plug-in is available, the Configuration tab will appear on the main application ribbon. In case the required plug-in is not on the list, you can easily upload it. For more detail information, refer to Configuring Plug-ins. As soon as the required plug-in is loaded, the Configuration tab appears on the main application ribbon. On clicking this tab on the ribbon, you can reach its toolbar containing the Trend icon. Therefore, click the Trend icon accessible in the Show section on the toolbar to open the Trend Configuration main window. In the revealed Trend Configuration window all available trends will be displayed.

Creating new trends
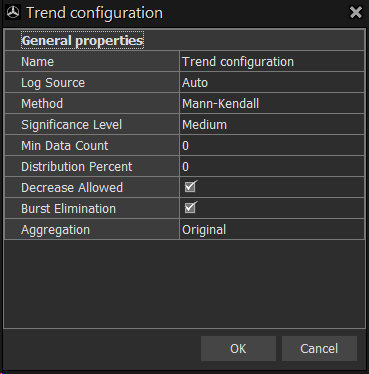
New trends can be created and configured in the Trend Configuration window. To do this, press the Trend icon accessible in the New section of the toolbar. Alternatively, right-click within the Trend Configuration panel to open the context-menu and select the Trend option. As a result, the Trend configuration dialog will appear within the main monitoring area. By making proper settings in the Trend configuration dialog window users can configure the way the trend will be performed.

Note. In case it is critical to have more reliable results, we strongly recommend to choose Hard significance level.
- Medium - (0,05).
- Soft - (0,1) soft significance level implies that out of ten detected trends one could be false.
On making all settings, press the OK icon to finish the configuration process. If done successfully, the recently created trend will be on the list in the Trend Configuration window.
For the new trend to be saved to the database, click the  Commit Changes icon at the left top corner of the main application window. As a result, all your recent settings will be saved. Otherwise, you can withdraw these changes by clicking the
  Rollback Changes icon.
To enable calculation of trends, a special service task must be created with the help of the Task Scheduler in MiScout Desk. When configuring the service task, make sure that proper trend configuration is assigned to the service task.
Modifying available trends
If required, a user can easily change the properties of available trends. To do this, simply select one of the trends by clicking it in the Trend Configuration window. To proceed, press the Edit icon found in the Modify section on the toolbar.

Alternatively, right-click within the Trend Configuration panel to open the context-menu and select the Edit option. As a result, the Trend configuration dialog will appear within the main monitoring. On making required settings in the Trend configuration dialog window, press Ok in the dialog. The Undo icon in the Modify section on the toolbar or the Undo option in the right-click context-menu allows users to quickly withdraw recent changes.
For the recently edited trend to be saved to the database, click the  Commit Changes icon at the left top corner of the main application window. As a result, all your recent settings will be saved in the database. Otherwise, you can withdraw these changes by clicking the
  Rollback Changes icon.
The workaround for deleting available trends is very similar to the one described for modifying trends. Therefore, to remove the trend from the database, select it in the Trend Configuration list and press the Delete icon found in the Modify section on the toolbar. Alternatively, right-click within the Trend Configuration panel to open the context-menu and select the Delete option. As a result, a red icon will appear next to the trend icon meant for removal. The Undo icon in the Modify section on the toolbar or the Undo option in the right-click context-menu allows users to quickly reject trend deletion.
To proceed with deleting the trend, click the  Commit Changes icon at the left top corner of the main application window. As a result, the trend will be removed from the database. Otherwise, you can cancel the deletion by clicking the
  Rollback Changes icon.